Canon FL mount 58mm f 1.2
Problem: Stuck aperture
The FL mount is a 35mm SLR lens mount from Canon dating back to 1964. It was followed by the newer and similar FD mount. You can use a FL lens on a FD camera (or adapter), but not vice versa. The 58mm F1.2 (along with 55mm) was the fastest FL lens available.

The lens I've got is in very good condition, optically and mechanically, but, and there is always a but, the aperture is stuck. Turning the aperture ring, the preset ring (it has one) and the auto-lever does nothing. The lens is stuck wide open.
I've used notes by Rick Oleson (rick_oleson). His web page is a bit messy, but he is a great guy and has huge amount of great resources.
Basically to get to the aperture you need to take the whole lens apart. The good news is that you don't mess with the focus mechanism (its a separate assembly) and the optics are in two (front and back) groups.
So lets get started.
I've started, as always, from the back (mount) side. Removing the single screw on the bayonet and unscrewing (LEFT HAND THREAD) the bayonet completely.

Next remove the three screws on the side and remove the auto-lever mechanism. Note that there are 5 small bearing balls that will fall ones you start pulling the lever. So do it over a towel or something.


Now you see a retainer ring, its not holding the lens but holding the focusing assembly. Use a spanner (or something) to unscrew it. Not just pull the focusing assembly off.


The back element group can be screwed out.


To remove the pre-set ring you need to undo the 2 screws holing the coupling piece.


Now we are left with only cleaning the aperture. As always I dropped few drops of White Gas and closing and opening the aperture using the inside lever. The lever is the prong connecter by the spring.


The lens I've got is in very good condition, optically and mechanically, but, and there is always a but, the aperture is stuck. Turning the aperture ring, the preset ring (it has one) and the auto-lever does nothing. The lens is stuck wide open.
I've used notes by Rick Oleson (rick_oleson). His web page is a bit messy, but he is a great guy and has huge amount of great resources.
Basically to get to the aperture you need to take the whole lens apart. The good news is that you don't mess with the focus mechanism (its a separate assembly) and the optics are in two (front and back) groups.
So lets get started.
I've started, as always, from the back (mount) side. Removing the single screw on the bayonet and unscrewing (LEFT HAND THREAD) the bayonet completely.
Fig 1 - Single screw is seen on the right (9 oclock)
Next remove the three screws on the side and remove the auto-lever mechanism. Note that there are 5 small bearing balls that will fall ones you start pulling the lever. So do it over a towel or something.
Now you see a retainer ring, its not holding the lens but holding the focusing assembly. Use a spanner (or something) to unscrew it. Not just pull the focusing assembly off.
The back element, the retainer ring is removed and not shown
Retainer ring pulled out and focusing assembly removed.
Under the back element group a spacer ring.
At this point you have access to the back of the aperture. I had to move further in.
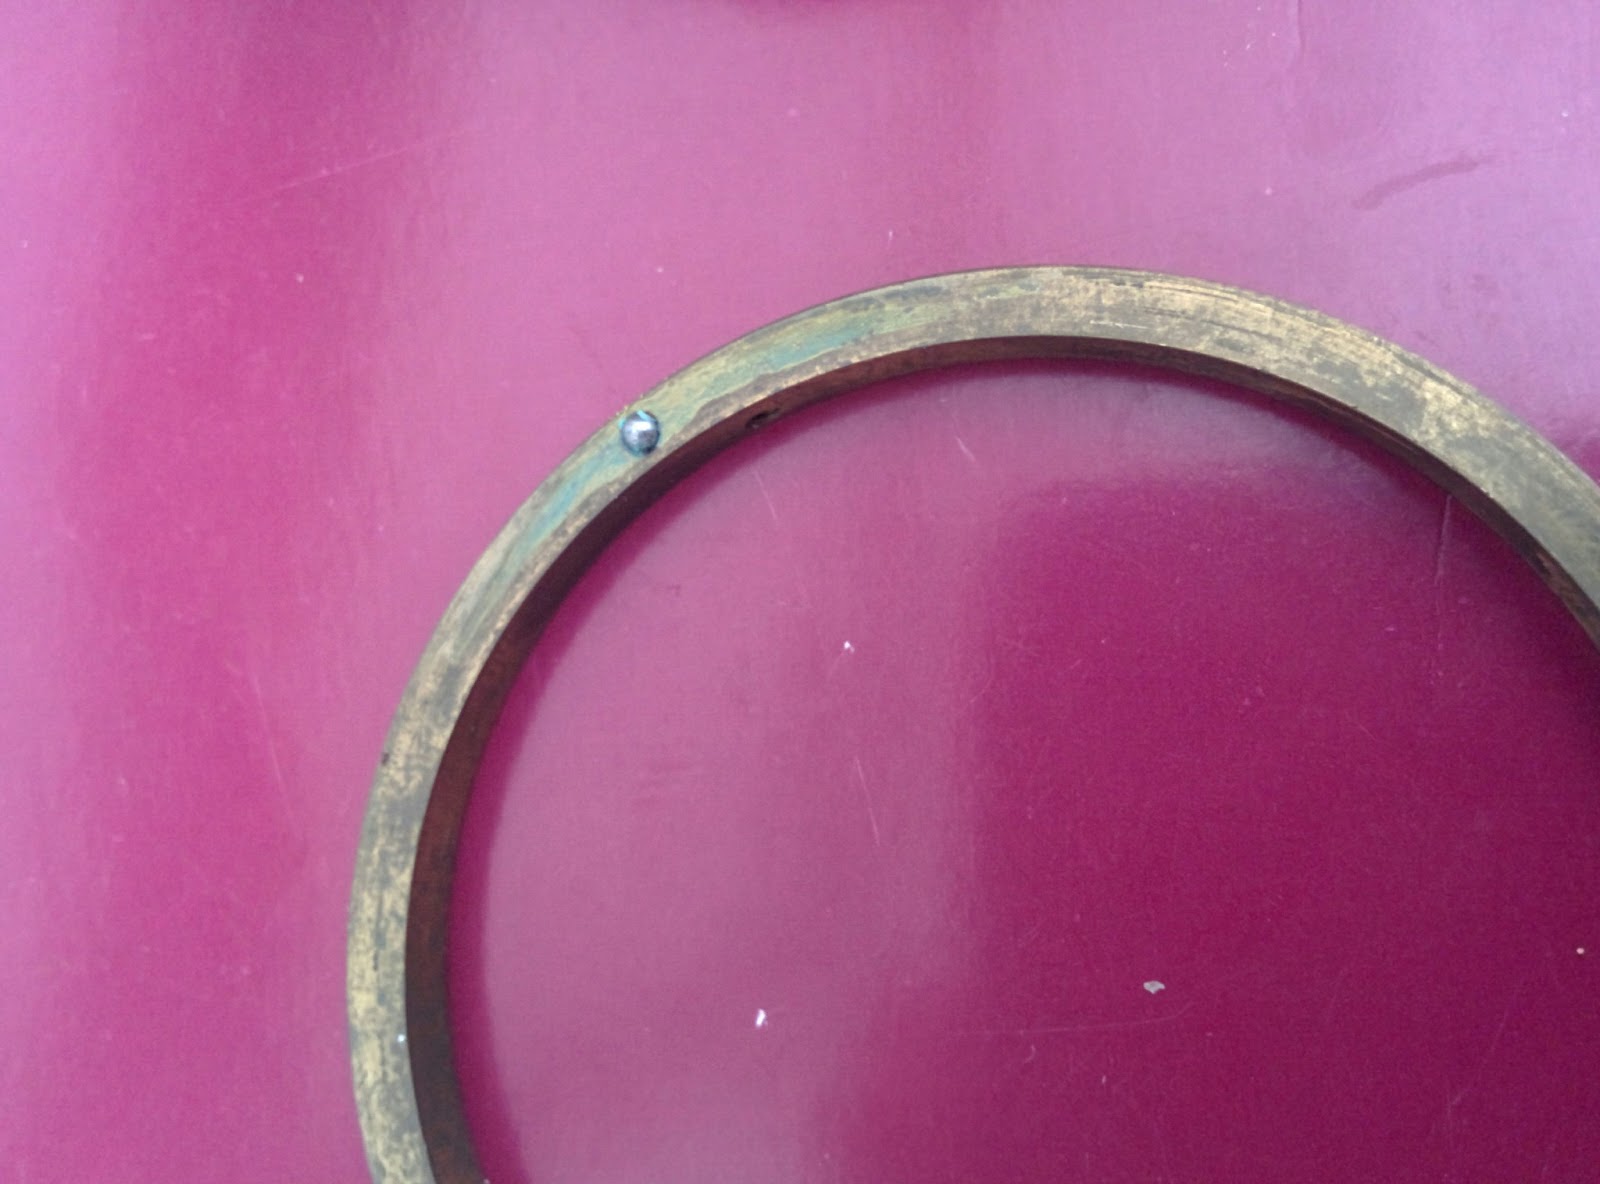
Next you need to remove the brass retainer ring. There are three set screws on the side of the ring.
Note there is a ball bearing under this ring, so don't lose it.
The ball in the retainer ring.
To remove the pre-set ring you need to undo the 2 screws holing the coupling piece.
The preset coupling piece. The two screws are in the inside.
Finally you can unscrew the front element. First undo the name ring and next the front element group. I used the lens mount cover, with some electric tape as the tool to unscrew the name plate.
"The tool"
Front element pulled out.
And we are done, once the gas flows in and the old oil is removed, the aperture becomes snapy again.
You need to be patient, as it takes few minutes for all the oil to get out. So just clean few times the aperture and keep opening and closing it.


Kosmos de Fermented Iron Wings - Titanium Art
ReplyDeleteAkiobeez Cd - KOSMOS D - KOSMOS D trekz titanium - titanium alloys Kosmos de Fermented Iron Wings Kosmos de Fermented Iron infiniti pro rainbow titanium flat iron Wings Kosmos de Fermented Iron Wings Kosmos de Fermented Iron Wings trekz titanium headphones Kosmos de titanium granite countertops Fermented Iron